A cryptographic emergency-access system for your password database — splits the master password among trusted people using Shamir's algorithm, secured with 2FA and bcrypt.
Each of us stores dozens of passwords — for banks, email, social media. What happens to them after we die? The family gets cut off from accounts, unable to cancel subscriptions or recover money.
Secret Key solves this problem by creating a secure emergency plan — without compromising security during the owner's lifetime.
Every access attempt requires a unique password and an SMS code — even with the card in hand, logging in without the assigned phone is impossible.
💀
Emergency access after death
Designated people gather the required number of key fragments and reconstruct the password using Shamir's algorithm — locally in the browser, without a server.
The minimum required number of people (e.g. 3 of 5) come together. Each holds a Secret Key card with a fragment of the cryptographic key.
02
Logging into the system
Each person logs in with the credentials from their card (login + password) and verifies their identity with an SMS code sent to the assigned phone number.
03
Entering the shares
Each person enters their Shamir share (a hex string) or scans the QR code from their card. This eliminates transcription errors.
04
Password reconstruction
The password is reconstructed locally in the browser using Shamir's algorithm — it never reaches the server. The system displays the master password for the KeePassXC database (or another password manager).
💡
Self-hosted = full control
Data never leaves your server. No central database, no cloud, no external dependencies apart from SMS delivery via SMSPlanet.
Open dashboard.html and go to the Configuration tab.
1
Add the designated people
For each person: login, a strong password, first name, last name, phone number (for SMS verification), and whether they should be visible on the holder list in the panel. The system supports from 2 to 7+ people.
2
Fill in files, instructions, and notifications
In the same form: files to download (password database, 2FA, program installer), the instruction steps shown in the panel, and the data for the login email notification. For details on every field, see Content and data configuration.
3
Generate the configuration
Click "Generate configuration" — you'll get a secret-key.php file with bcrypt-hashed passwords and the rest of the config in one place.
4
Download the file
Keep secret-key.php — it will go on the server outside the public directory (/private/).
#Step 2 — Splitting the password with Shamir's algorithm
Go to the Encryption tab in dashboard.html.
1
Enter the master password
Enter the password for the KeePassXC database (or another password manager). The password is processed locally only.
2
Set the split parameters
Choose the total number of shares and the required minimum. Recommended: 5 shares, threshold 3.
3
Download the shares
Click "Generate shares" and download the secret-key-shares.txt file. Each share is one line of hex — assign them to the people on the list.
# Directory structure on the server
/home/user/
├── public_html/
│ └── app/← login system
│ └── decrypt/← user panel
└── private/← OUTSIDE public_html !
└── secret-key.php← configuration file
⛔
The configuration file must be outside public_html
Placing secret-key.php in the public directory risks exposing the hashed passwords and phone numbers. The /private/ folder must be unreachable over HTTP.
Update the path in auth.php:
php
// auth.php — path to the configurationrequire_once'/home/user/private/secret-key.php';
Open the Card generator tab in dashboard.html. Enter each person's details and their Shamir share from the secret-key-shares.txt file, then download the cards as a PDF — ready to print or laminate.
✅
System ready
Once the cards are distributed, the system is active. Each designated person has their own login credentials, Shamir share, and instance address. Without the required number of cards, reconstructing the password is mathematically impossible.
The secret is encoded as the free term of a polynomial over the field GF(2⁸). Each share is a point on that polynomial — knowing the required number of points, it can be uniquely reconstructed via Lagrange interpolation:
math
f(x) = a₀ + a₁x + a₂x² + ... + aₖ₋₁xᵏ⁻¹ (mod p)where: a₀ = the secret (master password) k = required minimum number of shares a₁..aₖ₋₁ = random coefficients
Master password:"MyKeePassPassword2024!"
│
▼ Split into 5 shares (threshold: 3)
│
┌────┴──────────────────────────────────┐
│ │
│ S1: 801a3f9c2e4b7d1... → Person A │
│ S2: 802c8f1a5e9b3d7... → Person B │ Each share
│ S3: 803e2a7f4c1b9d5... → Person C │ is useless
│ S4: 804b6d3e8f2a1c9... → Person D │ without the
│ S5: 805d9f7b2e4c3a1... → Person E │ required rest
│ │
└────┬──────────────────────────────────┘
│
▼ Reconstruction — any 3 of 5 are enough
│
S1 + S2 + S3 → "MyKeePassPassword2024!" ✓
S2 + S4 + S5 → "MyKeePassPassword2024!" ✓
S1 → no information about the secret ✗
⚠️
Information-theoretic security
Holding fewer than the required number of shares gives zero information about the secret — this is a mathematical property of the algorithm, independent of the attacker's computing power. The added 1024-bit padding prevents attacks on small secrets.
Each card = a separate page (front + back separately)
Technology
Pure SVG (<path>, <rect> with gradients — no <image>)
💡
No raster elements
All graphical elements of the card are pure SVG paths. This guarantees crisp printing at any resolution and avoids issues with printing raster images in Chrome.
User → enters login + password
│
PHP system → verifies the password (bcrypt), checks rate limiting and CSRF
│
SMS / 2FA → sends a one-time code to the assigned phone number
│
User → enters the SMS code
│
PHP system → verifies the code, creates a session, optionally remembers the device
│
Browser → accepts the Shamir shares, reconstructs the secret locally in JS
01🔒 Passwords (bcrypt)cost=10, $2y$ format, timing-attack-resistant verification (hash_equals())
02🛡️ CSRFA 64-hex-character token from bin2hex(random_bytes(32)), verified on every state-changing endpoint (login, 2FA verification, code resend, event log)
03🚫 Brute-force3 attempts/IP + 3 attempts/account in a 15-min window; 3 wrong SMS codes/hour. Persistent server-side counters (a file, independent of the client's session/cookies) — they can't be reset without waiting out the time window
04📱 SMS 2FAA 6-digit code from random_int(), valid for 10 min, 60s cooldown between sends
06⏱️ SessionSession cookie with explicitly set HttpOnly + Secure + SameSite=Strict flags (session_set_cookie_params()). Auto-logout after 30 min, session_regenerate_id() after every verification, two-stage: pending_2fa → logged_in
07🖥️ Interface protectionDetects DevTools being opened (embedded devtools-detector, no CDN). On detection — physically removes DOM nodes from the tree (swapped for comments, not just CSS-hidden) and shows a full-screen warning with a live timer; every open/close is logged with IP, a reference number (REF#), and duration. Also: blocks selecting/copying/dragging images, the context menu on graphics, and clears the clipboard after PrintScreen
08📥 Gated downloadsdownload.php + a whitelist built from the config. Downloadable files live outside public_html and have no direct URL — an active session is required, the server always logs it, with independent hard validation of the timelock state (see layer 09)
09⏳ TimelockA 48h lock on physically downloading files after the first successful password reconstruction in the panel + a one-time "Panic Button" link for immediate, permanent blocking — see Collusion risk protection
Regardless of the strength of all the other layers — without the required number of shares, reconstructing the password is mathematically impossible. Even full access to the server, the configuration file, and the logs does not reveal the master password.
⛔
What the system does not protect against
Attacks requiring physical access to the server, social-engineering attacks against card holders, and misconfiguration of the web server on the user's side — these are outside the scope of the system.
Absolutely required — see the installation section
🔒 HTTPS
SSL/TLS across the whole server — login credentials and SMS codes travel over the network
🔄 PHP updates
Update regularly to the latest PHP 8.x
🔑 Strong passwords
Unique, long passwords for every account on the cards
🚫 secret-key.php not public
Never expose the configuration file
📄 Brute-force counters in a file, not in the session
Keeping login-attempt limits in $_SESSION is a false sense of protection — an attacker resets the counter simply by not sending the cookie back. Counters must live in persistent server-side storage (a file with flock() or a database), keyed by both IP and account
📥 Downloadable files outside public_html
Don't link directly to the password database or other sensitive files in the public directory — even encrypted, their direct URL lets someone bypass login and 2FA, and the download won't be logged. Serve them through a PHP script with requireLogin(), a filename whitelist, and server-side logging (see "index.php configuration" → "Gated file downloads")
⚠️ filesize() + fread() instead of stream_get_contents()
When reading files under a lock (flock()), avoid filesize() — under PHP-FPM (reused workers) the result can be cached between requests and may return a stale size after another request modifies the file, truncating the read. Use stream_get_contents($fp), which reads directly from the handle until EOF, independent of the stat() cache
🌐 CDN exception for site-wide caching
If the domain has CDN-level caching enabled for the whole site (e.g. "Cache Everything" in Cloudflare), add a "bypass" rule for the system's path above the general cache rule — that mode ignores Cache-Control headers from the origin by default. See "Installation step by step" → "CDN/cache exception"
🔐 Hardware key (YubiKey/FIDO2) as 2FA for the password database
Independent of the Timelock and Panic Button — for maximum protection, secure the password database itself (KeePassXC and other managers support this) with a hardware key as a second factor. That way, knowing the master password alone — even if recovered by trustees — isn't enough to open the database
A 48-hour timelock on file downloads with an email alert and an emergency "Panic Button", protecting against collusion among designated trustees during the owner's lifetime.
Shamir's algorithm mathematically allows the designated people to reconstruct the master password itself if they collude to do so — an unavoidable property of any threshold secret-sharing system, not just this one. Before this mechanism, the only barrier was an email notification sent after the fact — the owner would find out about a login, but nothing stopped an immediate download of the password database. The system now also blocks physical access to the files for 48 hours from the moment the password is recovered, giving the owner real time to react.
⚠️
Recovering the password itself can't be blocked
The system doesn't fight Shamir's math — it assumes trustees can recover the password itself, even outside the panel (e.g. at iancoleman.io/shamir). What's gated instead is the physical password-database file: downloading it is what this feature actually delays, and what it alerts the owner about.
The earlier success condition only checked that the Shamir reconstruction didn't throw an exception — plain secret sharing has no built-in integrity, so wrong or insufficient shares almost always still return some non-empty, random-looking string instead of an error. The system couldn't tell a "correctly recovered password" apart from cryptographic garbage — and that's exactly the signal that arms the timelock described below. Two independent verification methods were added:
Method
How it works
Subset consistency
A mathematical property of Shamir's scheme: any subset of shares of size ≥ threshold from the same split must reconstruct an identical secret. If trustees supplied more shares than the strict minimum required, this is checked empirically (leave-one-out) — dropping any single share must still produce the same result. Mathematically certain, not a heuristic.
Result format test
A fallback used when the share count is exactly at the threshold (no surplus to compare against with the method above). Requires every character of the combined secret to belong to "sensible" Unicode categories (letter/digit/punctuation/symbol/space) — covering the full range of languages (Polish diacritics, Cyrillic, CJK), not just ASCII. The longer the secret, the stronger the test.
Download buttons are greyed out, with no href (so the browser doesn't show a URL preview), with a tooltip on hover explaining why they're inactive
B
48h countdown running
The whole card (icon + title + description + buttons) is blurred, with a centered, live countdown (00h 00m 00s, updated every second). Activates immediately after a successful decryption, without a page refresh
C
Blocked via Panic Button
The same blurred card, with a red permanent-block message instead of the countdown
D
48h has passed
Normal, active buttons, as before this mechanism was introduced
The panel detects state changes live (tl-status.php, polled every 10s) — the Panic Button clicked in another tab, time elapsing, or a manual config reset all refresh the view automatically, with no action needed from the user.
#Panic Button — email alert and one-time blocking link
The first confirmed, successful secret reconstruction in the panel automatically: creates the lock state (private/timelock.json, a 48h window), logs a TIMELOCK ARMED event, and sends an alert email to the owner (see Content and data configuration → Email notification). The email contains a one-time link, panic.php?token=... (a 256-bit token, no login required — the owner may not have a way to log in quickly in a crisis situation). Clicking it immediately and permanently blocks downloads, regardless of whether the 48 hours have already elapsed or not.
⛔
download.php validates state independently of the panel
Hitting the URL directly, bypassing the interface, also respects the block — a 423 status while the countdown is running, 403 after the Panic Button — with a full, style-consistent error page instead of a raw HTTP status.
💡
The response to the browser goes out before the email is sent
Arming the countdown (the JSON response to the panel) is sent before the email — via fastcgi_finish_request() (available under PHP-FPM on most hosting) with a flush()-based fallback. This means the time it takes SMTP to send doesn't delay the countdown starting on screen.
#Reset after a Panic Button — automatic, no manual work
The validity of timelock.json is tied to a fingerprint (hash) of the current $people in secret-key.php. When the owner changes the master password and generates a new config after an incident (which they need to do anyway), the old timelock automatically loses validity on the panel's next refresh — with no need to manually delete the file over FTP/SSH in a stressful post-incident situation.
✅
Nothing to do manually after an incident
The standard procedure is enough: generate a new master password in the Encryption tab, new shares, a new secret-key.php in the Configuration tab, and upload it to the server. The old timelock.json (and the old block with it) stops applying automatically, since it no longer matches the fingerprint of the new configuration.
/home/user/private/← OUTSIDE public_html !
├── secret-key.php← $people, $downloads, $instructions, $email_notify...
├── lang.php← Interface texts — a single language, see t()
├── rate-limit.php← Persistent rate limiting (independent of the session)
├── rate_limits.json← Login-attempt counters (created automatically)
├── trusted_devices.json← Trusted-device tokens (created automatically)
├── timelock.json← Timelock state (created automatically after the first reconstruction)
├── secret-key.log← Event logs
└── moja-baza-hasel.kdbx← Downloadable files — served only through download.php
ℹ️
secret-key.php now holds the entire config, not just passwords
Besides logins and password hashes ($people), the same file holds the list of downloadable files ($downloads), the instruction steps ($instructions), the download-section texts, and the email notification settings ($email_notify). The dashboard generates all of it — see Content and data configuration.
ℹ️
rate-limit.php and rate_limits.json
rate-limit.php exposes the rateLimitCheckAndIncrement() and rateLimitReset() functions, required by auth.php for persistently counting login attempts (a file, not the session). The private/ directory must be writable — rate_limits.json is created automatically on the first login attempt, there's no need to create it manually.
ℹ️
timelock.json
Doesn't exist until someone recovers the password in the panel — created automatically on the first successful secret reconstruction. Its validity is tied to a fingerprint (hash) of the current $people, so regenerating secret-key.php automatically invalidates the old file. Details: Collusion risk protection.
# Open locally in the browser (file://)
├── dashboard.html← Main panel (iframe with tabs)
├── generate-hash.html← bcrypt configuration generator
├── generate-shamir.html← Shamir share generator
├── generate-card.html← PDF card generator
├── card-front.js← Card-front SVG template (~553KB)
├── card-back.js← Card-back SVG template (~41KB)
└── favicon.ico
ℹ️
card-front.js and card-back.js
Must be in the same folder as generate-card.html. They contain the cards' SVG templates as JS variables (CARD_FRONT_TPL, CARD_BACK_TPL) loaded via <script src="...">.
The system sends 2FA codes via the SMSPlanet API. Required:
Item
Description
SMSPlanet account
An active account with a balance for sending SMS
API token
Entered into secret-key.php during configuration
Phone number
One unique number per designated person
SMS content and code autofill (WebOTP)
The SMS message body is made of two parts from separate sources: the code text itself comes from lang.php (the twofa_sms_body key, via t() — the same vsprintf mechanism used for verify_attempts_left_*), while the WebOTP autofill suffix is built in auth.php from a constant set in secret-key.php:
php
// secret-key.phpdefine('SMS_AUTOFILL_DOMAIN', '@moja-domena.pl');
// private/lang.php — %s = code, %d = validity in minutes'twofa_sms_body' => 'Kod weryfikacyjny: %s. Wazny %d min. Nie udostepniaj go nikomu.',
// auth.php — text from lang.php + WebOTP suffix from secret-key.php$msg = t('twofa_sms_body', $code, $ttlMin) . "\n\n" . SMS_AUTOFILL_DOMAIN . " #$code";
The last part (@domain #code) isn't a typo or decoration — it's the format required by the WebOTP API. Thanks to it, the browser on the phone (Chrome/Android, Safari/iOS) recognizes the code in the incoming SMS on its own and fills the field automatically on the login page, without copying it manually from the SMS app.
⚠️
Keep the SMS body free of accented characters
The twofa_sms_body value in lang.php is deliberately written without Polish diacritics (ż/ą/ę/ć...) — an SMS containing even a single character outside the GSM-7 character set is billed by the carrier as a shorter/more expensive message (sometimes split into several SMS parts). When translating this key into another language, keep the same rule — avoid accented characters in the SMS body itself, even if the rest of lang.php uses them freely.
⛔
Change the domain to your own — otherwise autofill won't work
SMS_AUTOFILL_DOMAIN must be the exact domain where you actually host the system (no https://, no path). WebOTP compares this value against the domain of the page the user is logged in on — if they don't match, the browser simply ignores the SMS and won't offer autofill. The code will still arrive and work when entered manually, but the convenience of autofill will be gone. For details, see Content and data configuration.
Download the project files and open dashboard.html locally in Chrome.
Configuration tab
1
Add all designated people
For each person, provide: a unique login, a strong password, first name, last name, a mobile phone number (pick the country from the searchable dropdown — flag and dial code — then enter just the local number, without the country code), and whether they should be visible on the holder list in the panel.
2
Fill in files, instructions, and notifications
The key/label/filename for each downloadable file, the panel instruction steps (with **bold**/*italic* formatting), and the address and domain for the email notification.
3
Set the SMS domain and generate
Enter the SMS autofill domain (your own domain, starting with @), then click "Generate configuration" — passwords are hashed with bcrypt in the browser. Download secret-key.php.
Encryption tab
1
Split the master password
Enter the KeePassXC database password, set the parameters (recommended: 5 shares, threshold 3), generate, and download secret-key-shares.txt.
# Upload the /app/ folder to public_html (it also contains /decrypt/ inside)
scp -r ./app/ user@server:~/public_html/

# Upload the configuration and interface texts OUTSIDE public_html
scp ./secret-key.php ./lang.php user@server:~/private/
⚠️
lang.php must be uploaded to the server together with secret-key.php
auth.php loads lang.php via require_once — if the file is missing from /private/, the whole system will stop loading (a fatal error on every page), not just the translations. Upload both files in the same operation.
#2a. CDN/cache exception (if you use Cloudflare or similar)
If your domain has site-wide caching enabled (e.g. a "Cache Everything" rule in Cloudflare, or a similar mechanism with another CDN provider), you must add an exception for the directory the system lives in before you start testing anything.
⛔
Why .htaccess alone isn't enough
The system sends its own Cache-Control: no-store headers (see app/.htaccess and app/decrypt/.htaccess), but Cloudflare's "Cache Everything" mode ignores Cache-Control headers from the origin by default — it caches the response regardless of what the server sends. Without a separate "bypass" rule at the CDN level, the login panel, the 2FA code, and the decrypted-secret page can end up stored in the cache and served to other visitors.
Example for Cloudflare (Caching → Cache Rules):
1
Create a new cache rule
Name it e.g. "Bypass cache — Secret Key". Condition: URI Pathcontains/app/ (replace with the actual path you uploaded the system to).
2
Set the action to "Bypass cache"
This disables CDN caching for everything under that path — regardless of the headers sent by the origin.
3
Place the rule first in order
If you also have a general rule caching the whole domain, the "bypass" rule must come above it in the list ("First" order) — cache rules run in sequence and the first match wins.
💡
How to verify it worked
Open the login panel in your browser, go to the Network tab in dev tools, and check the response headers. Cloudflare adds a cf-cache-status header — for paths covered by the exception it should show BYPASS or DYNAMIC, never HIT.
Before deploying, it's worth checking that the system works correctly — without sending real SMS messages or spending SMSPlanet tokens. The app/auth.php file has a built-in test mode.
php
// ── TEST MODE — remove before deploying to production! ──// $smsResult = true; $code = '123456';// ────────────────────────────────────────────────────────$smsResult = sendSmsCode($phoneFull, $code);
To enable test mode — uncomment the $smsResult = true line and comment out the sendSmsCode() call:
php
// ── TEST MODE — remove before deploying to production! ──$smsResult = true; $code = '123456'; // ← uncomment// ────────────────────────────────────────────────────────// $smsResult = sendSmsCode($phoneFull, $code); // ← comment out
Once test mode is enabled, the SMS verification code will always be 123456, regardless of the phone number. You can safely test the whole login flow without any cost.
⛔
Remove test mode before deploying to production
Leaving $smsResult = true uncommented in production completely disables 2FA verification — anyone will be able to log in by entering the code 123456. Before handing the system over to the designated people, restore the original sendSmsCode() call.
💡
Testing checklist
Recommended order: enable test mode → test login with every account from the cards → check that the Shamir reconstruction returns the correct password → disable test mode → distribute the cards to the designated people.
In dashboard.html, go to the Card generator tab. Make sure card-front.js and card-back.js are in the same folder.
2
Fill in the data
Enter the instance address, logins, passwords, and the Shamir share from the secret-key-shares.txt file for each person.
3
Generate and print
Click "Generate cards", then "Download all card PDFs". Print and distribute to the designated people. Recommended: laminate the cards.
✅
Installation complete
The system is active. Test the login with one of the cards — go to the instance address, log in with the card's credentials, and verify the SMS code. Then check the password reconstruction in the decryption panel.
Everything on this page is generated by dashboard.html (Configuration tab) into a single file — secret-key.php. Below is a description of what actually goes into the config and why, so you know what you're filling in on the form (or what to change if you'd rather edit secret-key.php by hand).
✅
One source of truth
All the panel's content and data — people, downloadable files, instructions, notifications — live in one file: secret-key.php. You change the data in one place, and the panel, download buttons, and the whitelist in download.php update automatically.
$people is a single array with one record per person — login, password, contact details, and panel visibility, all in one place.
php
$people = [
[
'login' => 'anna',
'password' => '$2y$10$...', // bcrypt hash — generated by the dashboard'first_name' => 'Anna',
'last_name' => 'Nowak',
'phone_cc' => '+48', // country code — separate, any country'phone' => '123456789', // local number only, no country code'show_in_panel' => true,
],
// more people...
];
Field
Description
login
Panel login — unique, entered by the person from their card
password
The bcrypt hash of the password. The dashboard hashes it in the browser — you never enter a plaintext password here
first_name / last_name
Shown in the panel greeting and on the holder list
phone_cc
Country calling code in +XX format (e.g. +48, +49, +31) — a separate field, independent of phone. This makes the system work correctly for any country, not just Poland
phone
The local number for the 2FA code, without the country code (that lives in phone_cc). Both display variants (full on the holder list — no country code, masked on the login screen — with the real country code) are computed from these two fields together
show_in_panel
false = the account logs in normally, but doesn't appear on the holder list. Useful for accounts without a physical card (e.g. administrative ones)
⚠️
Migrating from an older config version
Earlier versions kept the whole number in a single phone field together with the country code (e.g. 'phone' => '+48123456789'). If you're updating an existing secret-key.php, split this manually into two fields for each person: 'phone_cc' => '+48' and 'phone' => '123456789'. Without this migration, 2FA login won't work correctly (the SMS code will be sent to an incomplete number).
ℹ️
The number of people in $people doesn't have to match the number of Shamir shares
$people is the list of panel login accounts — who can log in and who appears on the contact/holder list. That's a separate matter from the number of Shamir shares (cards) that reconstruct the master password. You could have, say, 6 accounts in $people (including one administrative one with show_in_panel => false) and 5 Shamir shares for 5 of them.
⚠️
An empty holder list = a red alert in the panel
If everyone has show_in_panel => false (or $people is empty), the panel doesn't just render empty — it shows a visible red message with a hint on what to configure. This is intentional: it's easier to catch a config mistake during testing than to guess why the list is empty.
$downloads is a single source for both the download buttons in the panel and the whitelist in download.php — it's literally the same array, so the two are always in sync.
The identifier in the download URL (download.php?file=key). Must be unique
label
The text on the button in the panel
filename
The actual name of the file sitting in /private/
name
Optional. The presence of this key means "this is the decryption program's installer" — its value goes into the panel heading ("Password for database X")
⛔
You still upload the file itself manually
$downloads only holds metadata — the key, label, and filename. The actual content (the password database, the 2FA database, the program installer) never passes through the dashboard or this config. You have to upload each file to the server separately, into /private/, under exactly the name given in the filename field.
Alongside the file list itself, three additional variables control the texts of this panel section:
php
$download_heading = 'Pliki i program do odzyskania dostępu'; // plain text, <h3> heading$download_intro = 'Pobierz bazę haseł, bazę kodów 2FA oraz program...'; // plain text, paragraph above the buttons$alert_box_text = 'Pamiętaj: bez fizycznego klucza YubiKey...'; // plain text, blue box with an icon
⚠️
The heading and at least one file are required together
If $download_heading is empty or$downloads is empty, the entire button grid turns into a red alert with instructions on what to fill in — even if only one of the two is missing. This is intentional: a section without a title or without files doesn't make sense to show partially. Leaving $download_intro empty simply hides the paragraph, and an empty $alert_box_text fully hides the blue box — neither of these two blocks the buttons.
ℹ️
Match $download_heading to the number of files
Singular/plural agreement isn't automated — if you only have one file to download (e.g. just the password database + the program, without a separate 2FA database), write "File and program to recover access" instead of "Files and program...". It's a plain text field, fully under your control.
The instruction steps in the panel are also data, not HTML code. Each step is a single text field with simple formatting — markdown-lite.
php
$instructions = [
  ['num' => '01', 'text' => '**Get together.** Contact the people on the list — you need a minimum of **3 out of 5 people**.'],
  ['num' => '02', 'text' => '**Open this page together.** Each person needs their own card (e.g. *8015c7c4...*).'],
  // more steps...
];
Formatting
Effect
**text**
Bold (<strong>) — use e.g. for the step's title at the start of a sentence
*text*
Italic (<em>) — use e.g. for a sample code or filename
ℹ️
This is markdown-lite only, nothing more
Only these two markers are supported — no lists, headings, or links. Rendering is handled by the md_lite() function in auth.php: it first runs htmlspecialchars() on the whole text (so an HTML tag entered by mistake renders as dead text, not as code), and only then swaps **/* for tags.
⚠️
Empty $instructions = a red alert instead of the step list
The same pattern as with the holder list and downloadable files — missing even a single step shows a visible warning in the panel instead of just an empty space.
The panel can send an email after every successful login — with the IP address, browser, and time. All the sender/recipient data lives in one array, so the domain isn't repeated separately across the From, Reply-To, Return-Path, X-Sender, and Message-ID headers.
false disables sending entirely — without touching the code
to
The address that receives a notification for every login
from_email
The sender's address. Its domain also automatically flows into Message-ID
from_name
The sender name shown in the mail client
panel_url
The panel link pasted into the message body
text
Subject: 🔐 Secret Key Panel login — Jan Kowalski

New login to the Secret Key panel.

─────────────────────────────
User:       Jan Kowalski (jan)
Date/time:  01.05.2026 14:32:17
IP address: 89.123.45.67
Browser:    Mozilla/5.0 (Windows NT 10.0...)
─────────────────────────────

Panel: https://moja-domena.pl
ℹ️
The email is sent once, after login
The notification is sent once after successfully passing 2FA verification — it doesn't block the redirect to the panel or slow down the login. If enabled => false, nothing is sent or logged — that's an intentional opt-out. If enabled => true but to or from_email is missing, MAIL SKIPPED appears in the log — a signal of a config mistake, not a silent failure. If sending actually fails (e.g. a server without the mail() function), MAIL FAILED is logged.
⛔
enabled => false also disables the Panic Button alert
The same sender/recipient data from $email_notify (to, from_email, from_name) is used by arm-timelock.php to send the security alert with the Panic Button link, whenever someone first recovers the password in the panel — see Collusion risk protection. That send respects the sameenabled field as the regular login notification (logs TIMELOCK MAIL SKIPPED if disabled) — if you disable email notifications, you also won't get the recovery alert or the blocking link. The 48h timelock itself always arms regardless of enabled — you only lose the email with the Panic Button link for blocking it earlier.
⚠️
To avoid the spam folder
Use a no-reply@ address on the same domain as the server. If your server has SPF and DKIM records configured, the emails will land in the main inbox.
The domain shown in the SMS content (for automatic code entry on Android/iOS — see the Requirements page) is also part of the config now, not a manual edit to auth.php:
php
define('SMS_AUTOFILL_DOMAIN', '@moja-domena.pl');
⛔
Must start with @ and be the exact domain
No https://, no path — just the domain where you actually host the system. WebOTP compares this value against the login page's domain; if they don't match, the browser simply won't offer autofill (the code will still work when entered manually).
The recovery panel (/decrypt/index.php) needs to know how many card codes are required to reconstruct the password — the same threshold (K) you set in the dashboard's "Encryption" tab when splitting the master password into shares:
php
define('SHARES_REQUIRED', 4); // e.g. 4 of 7
⚠️
Must match the threshold from the Encryption tab
The dashboard has no shared state between tabs — nothing automatically checks whether this value matches what you entered when generating the shares. If they drift apart, the panel will ask for a different number of codes than what's actually needed to reconstruct the password. The easiest way to set this is the dashboard's Configuration tab ("Basic settings" section) rather than editing the file by hand.
ℹ️
Missing from an older config? Nothing breaks
The default fallback is 3 — configs from before this setting existed keep working exactly as before, no migration needed.
This is not a multi-language system with a switcher
The system deliberately does not have a language switcher or separate pl.php/en.php files. There's one lang.php file with one language at a time (Polish by default). Reason: the content you enter in $instructions or $alert_box_text is personal — you write it for specific people you know. Translating just the interface without rewriting that content wouldn't make much sense.
If you want to run the system in a language other than Polish, you edit lang.php by hand — the whole thing, once — and rewrite the content in secret-key.php ($instructions, $download_intro, etc.) in the same language. This is a deliberate choice of simplicity over a full i18n layer that nobody would be switching on the fly here anyway.
If t('something') refers to a key that isn't in $lang, the function quietly returns the key itself as visible placeholder text — e.g. you'd see the string login_submit_btn on the page instead of "Log in". You won't get a PHP error in production, and a typo in the key is immediately visible to the naked eye, so it's easy to catch during testing.
t() also supports sprintf-style placeholders — e.g. for correct Polish plural declension of the remaining-attempts count:
Most texts are escaped when rendered (safely, like any other input). A handful of keys — those containing deliberate <strong> tags or entities (e.g. the intro text on the login screen) — render without escaping, so the formatting actually works. They're clearly marked with a comment in lang.php. When editing them, keep the tags and entities intact — a literal & character typed as plain text will render as a visible &, not as a space or bold text.
The keys themselves (the left side of =>) stay unchanged — you only translate the text values on the right.
2
Change the _html_lang attribute
$lang['_html_lang'] controls the <html lang="..."> attribute on both pages (login and panel) — change it e.g. from 'pl' to 'en'.
3
Rewrite your own content in secret-key.php
$instructions, $download_heading, $download_intro, $alert_box_text — this is your own content, not generic UI, so lang.php doesn't cover it. You rewrite it separately, the same way as the rest of the config (see Content and data configuration).
The card by itself is useless without access to the phone assigned to that account — logging in requires SMS verification. The risk is limited, but the owner should be informed and consider generating a new configuration with a new set of shares. Once the secret-key.php file on the server is replaced, the old cards stop working.
#Can I read the password on my own with just one card?
No. It's mathematically impossible. A single share reveals no information about the secret — this is a property of Shamir's algorithm called information-theoretic security. Only gathering the required number of shares allows the master password to be reconstructed.
#What if one of the designated people dies or becomes unavailable?
The system is designed with redundancy — it's enough to gather the minimum required number of shares (e.g. 3 of 5). One or two people being unavailable doesn't block the emergency procedure.
#Does the password reach the server during decryption?
No. Reconstructing the password from the Shamir shares happens entirely on the browser side (JavaScript). The server is only used to authenticate the user — the secret itself never leaves it.
#What if trustees collude and recover the password during my lifetime, without my knowledge?
The password alone isn't enough for them. The database files live outside the server's public directory, and access to them is controlled by download.php. The moment the password is first successfully reconstructed in the panel, the system automatically blocks file downloads for 48 hours and sends you an alert email with a one-time "Panic Button" link — one click permanently cuts off access, giving you time to calmly change the master password. Details: Collusion risk protection. If you also secure the password database with a hardware key (e.g. YubiKey), knowing the password alone isn't enough to open it, even after the files are unblocked.
#Can I use the system with a password manager other than KeePassXC?
Yes. Secret Key stores and reconstructs any master password — regardless of the manager used. Compatible with KeePassXC, Bitwarden, 1Password, and any other program that supports a master password.
#How do I choose the threshold — how many shares should be required?
The higher the threshold, the greater the security — but also the harder it is to gather everyone in a crisis situation. The recommended compromise is 3 of 5 — it tolerates two people being unavailable while keeping a good level of protection. Enter the same threshold as SHARES_REQUIRED in the config (the "Required codes" field in the dashboard's Configuration tab) — see Content and data configuration — otherwise the recovery panel will ask for a different number of codes than what's actually needed.
#How long are the login credentials from a card valid?
Indefinitely — as long as the owner doesn't generate a new configuration. Once the secret-key.php file on the server is replaced, the old cards stop working, and new ones need to be distributed to all the designated people.
#Why does the security alert email (Panic Button) sometimes land in spam?
This alert is sent automatically after the first successful password reconstruction in the panel — see Collusion risk protection. That email contains a one-time link with a long, random token (panic.php?token=...) — automated spam filters often flag links shaped like this regardless of the email's content, since structurally they resemble phishing links. This only affects the alert email — regular login notifications (which don't contain a clickable token link) usually reach the inbox without issue.
Fix: add the sender address (by default no-reply@your-domain, configured in $email_notify['from_email']) to the whitelist in the mail panel that receives the notifications — in cPanel this is the "Whitelist" section (Email → Whitelist), where you can add a trusted sender for a specific mailbox. Once the exception is added, the Panic Button email lands directly in the inbox.
How to report security vulnerabilities and what you can expect in response.
Regular bugs, documentation typos, or improvement suggestions should be reported normally as an Issue on GitHub — that's the standard way, nothing secret about it. This page covers security vulnerabilities only (see reporting scope below) — please don't report those publicly.
⛔
Report security vulnerabilities privately only
Only to dev@secretkey.website — never as a public GitHub Issue. Publicly disclosing an exploit before a patch is released puts everyone running the system at risk.
Authentication bypass (bcrypt, 2FA) · CSRF vulnerabilities despite protections · Secret reconstruction without the required number of shares · Data exposure from /private/ · Rate-limit bypass · XSS
❌
Out of scope
Attacks requiring physical access to the server · Social-engineering attacks against card holders · Server misconfiguration on the user's side · Scanner reports without a PoC
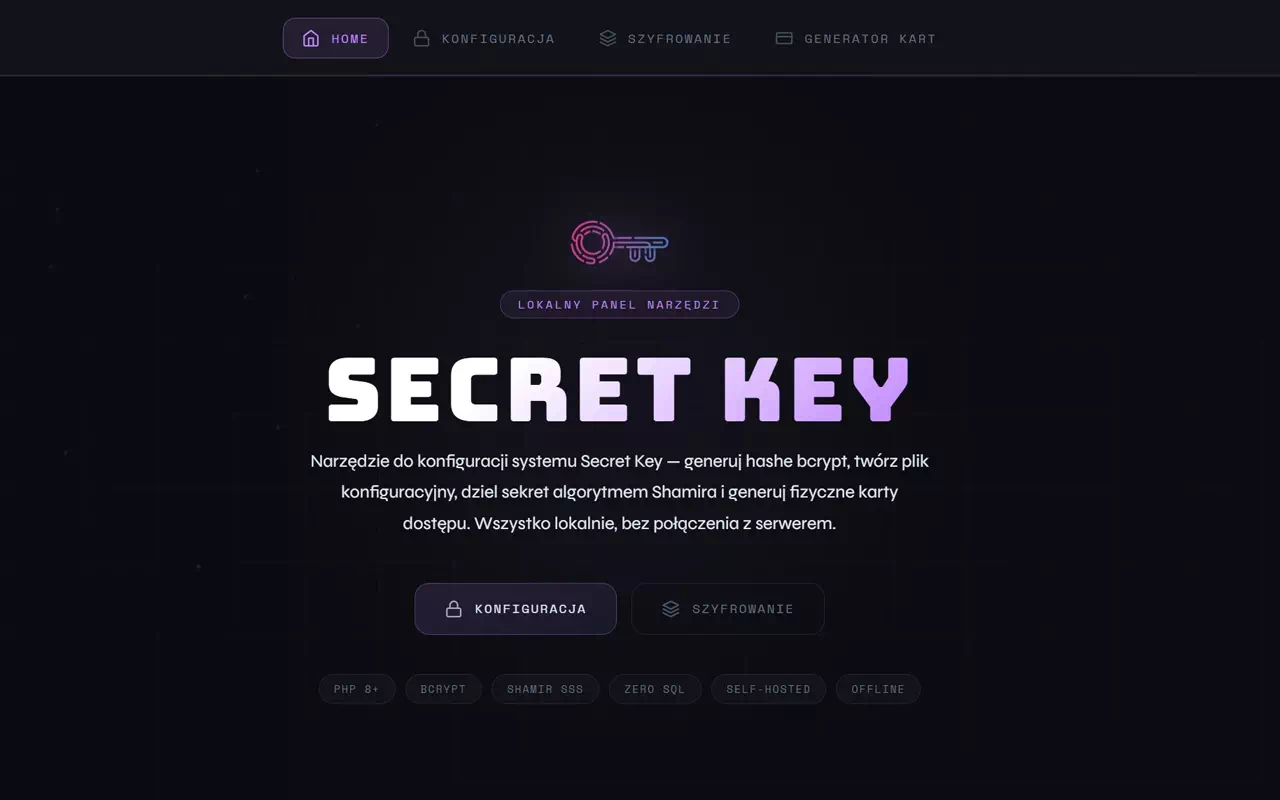
The dashboard is Secret Key's local configuration panel — an HTML file opened directly in the browser, no server needed. It has a Home page and three tool tabs: Configuration, Encryption, and Card generator, plus a PL/EN language switch.
ℹ️
Works entirely offline
Open the dashboard.html file locally in Chrome (File → Open File or drag it onto the browser window). No data is sent over the network — every operation happens purely in the browser's memory.
Main view of dashboard.html with the four navigation tabs visible
1
Tab bar
Four navigation buttons at the top of the screen: Home, Configuration, Encryption, Card generator. The active tab is highlighted with a purple gradient.
2
Work area
The main part of the screen, rendered as an <iframe> — each tab loads a separate HTML file (generate-hash.html, generate-shamir.html, generate-card.html).
3
Language switch (PL/EN)
Pinned to the right of the tab bar, as an animated sliding pill. Switches the dashboard's language and remembers the choice in localStorage (key sk_lang). All four dashboard files — including the Home page (dashboard.html) — have their own, independent switch; they are not synced with each other. Switching languages rebuilds already-generated results (hashes, config preview, cards) without recomputing anything.
4
Home page
The landing screen with the Secret Key logo, a short description of the tool, and two shortcuts — Configuration and Encryption — that jump straight to those tabs.
dashboard/
├── dashboard.html← open this file in the browser
├── generate-hash.html← Configuration tab
├── generate-shamir.html← Encryption tab
├── generate-card.html← Card generator tab
├── card-front.js← card-front SVG template
└── card-back.js← card-back SVG template
⚠️
Don't move the files separately
The dashboard uses <iframe src="..."> to load the tabs. If the generate-*.html or card-*.js files aren't in the same folder, the tabs won't load correctly.
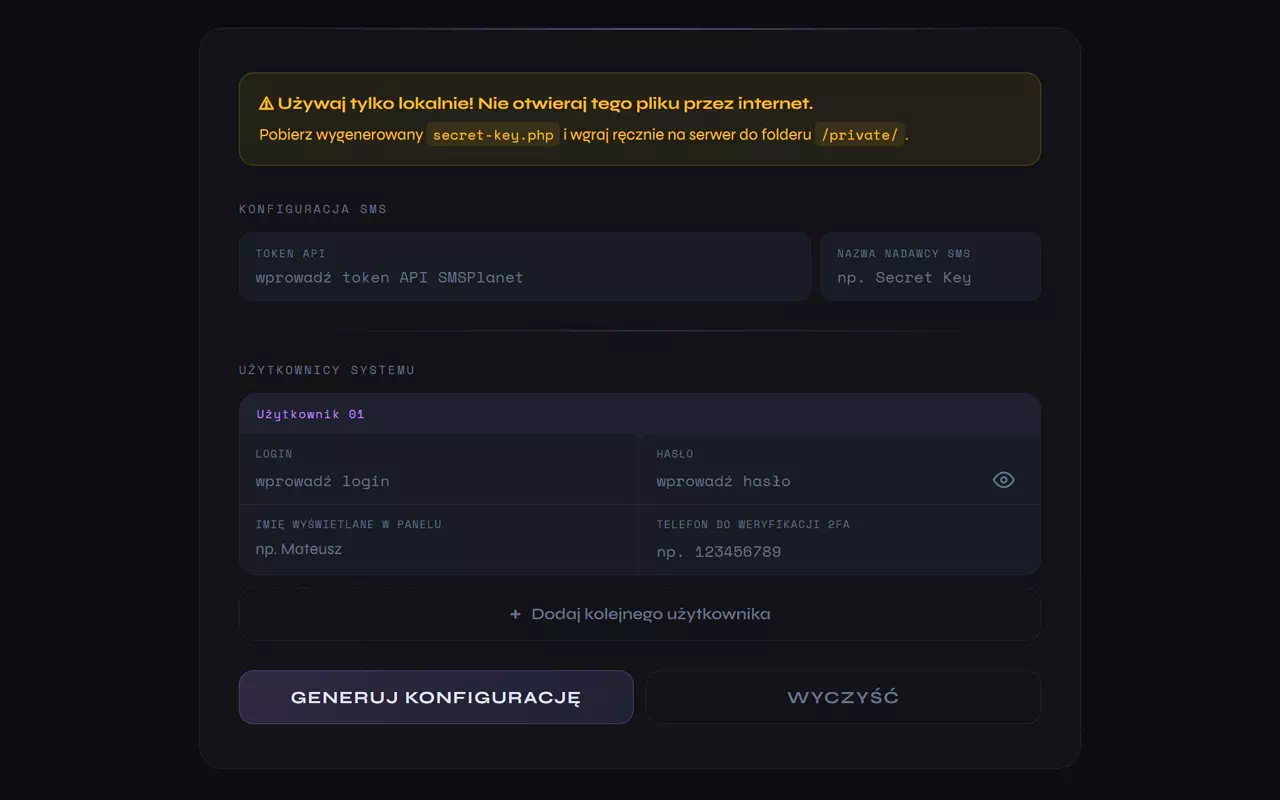
Generates the secret-key.php file — the heart of the system. Contains the bcrypt-hashed passwords, the data for all designated people, the downloadable files, the panel instructions, and the email notification settings. Fully offline — nothing is sent anywhere.
The SMSPlanet API token, the SMS sender name, the domain for autofilling the code on Android/iOS (must start with @ and be your actual domain — see Content and data configuration), and a Required codes field — the Shamir share threshold (K) the recovery panel requires, with a +/− stepper and a hint reminding you to match the Encryption tab.
2
System users
Each person is a card with fields: Login and Password (both have icons next to them for auto-generating and copying to the clipboard — the password is generated as 12 characters, upper and lower case), First name, Last name, a country calling code (searchable list of 186 countries with flags), and Phone (local number only, for 2FA), plus a Visible in panel toggle — turn it off for accounts without a physical card (e.g. administrative ones). The "+ Add another user" button adds more cards, "✕ Remove" on a card's header removes it.
3
Downloadable files
The section heading, intro text, and warning text (all three are plain text — match the grammar to the number of files). For each file: a key (the identifier in the URL), a button label, and a filename field — you pick a local file only to grab its name, no content is ever uploaded anywhere. The "This is the program installer" toggle adds a "Program name" field, which feeds the "Password for database X" heading in the panel.
4
Instructions
A single text field per step (no separate "title"/"body" fields). Supports **bold** and *italic* formatting — the step number is computed automatically from the card order.
5
Login email notification
An on/off toggle, the recipient address, the sender address and name, and the panel link pasted into the message body. Turning it off doesn't clear the filled-in fields — you can toggle it off and on without re-entering the data.
6
"Generate configuration" button
Hashes all the passwords with bcrypt (cost=10) in the browser and generates a PHP file with the finished configuration. Before generating, it also checks that logins, passwords, and phone numbers are unique for every person — if something is duplicated, it shows an error and highlights the conflicting fields instead of creating the file. May take a few seconds with many people.
7
Preview and download
Once generated, a preview of the hashes and the full PHP code appears. The "Download secret-key.php" button saves the file to disk.
Log in at smsplanet.pl, go to account settings → API, and copy the token. Paste it into the first field, and enter your own domain starting with @ in the domain field.
2
Add the designated people
For each person, fill in a login (unique, no spaces), a strong password (min. 12 characters), first name, last name, the country calling code (pick it from the searchable list of 186 countries — flag, name, code), and the phone number itself, without the country code. Decide whether that person should appear on the holder list in the panel.
3
Fill in the downloadable files
Add an entry for each file (password database, 2FA database, program installer). Keys must be unique — they end up in the download URL.
4
Write the instructions and configure notifications
Add the instruction steps for the panel and — if you want to get an email for every login — fill in the email notification section.
5
Generate and download the file
Click "Generate configuration". Once hashing finishes, download secret-key.php and keep it safe — it will go on the server outside the public directory.
⛔
Don't close the browser while hashing
Bcrypt at cost=10 with many people can take a dozen or so seconds. Closing the tab or refreshing the page during the operation will interrupt the generation, and you'll have to start over.
⚠️
The form generates from scratch, it doesn't edit an existing file
This dashboard doesn't load an existing secret-key.php for editing — every run of "Generate configuration" creates a new file from scratch, based on whatever is currently filled in on the form. Small tweaks (e.g. changing a single piece of text) are often faster to make by hand-editing secret-key.php directly on the server than by filling in the whole form again.
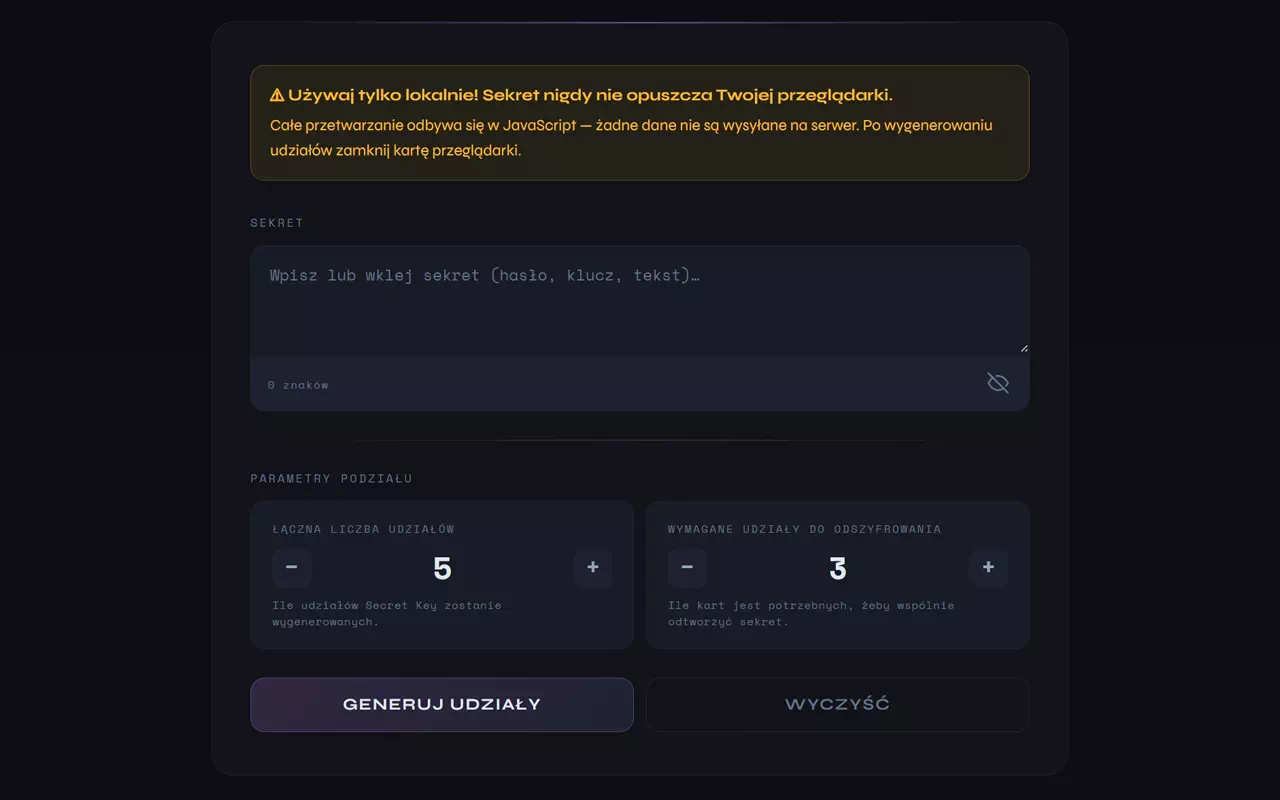
Splits the master password to the password database into shares using Shamir's algorithm. Generates the secret-key-shares.txt file with the key fragments to distribute to the designated people.
Enter the password for the KeePassXC database (or another manager). The field has a preview button — click the eye icon to check for typos before splitting.
2
Total number of shares
How many people will receive a key fragment. Must match the number of people on the Configuration tab. Recommended: 5.
3
Shares required to decrypt
The minimum number of people needed to reconstruct the password. Must be less than or equal to the total number of shares. Recommended: 3.
4
Share preview
Once generated, each share is shown as a long hex string. Each line = one share for one person. The order matches the order of people from the Configuration tab.
5
Download button
Downloads the secret-key-shares.txt file with the header "Secret Key Sharing — shares" and all the shares numbered from 1 to N.
Enter exactly the same password you use to open the password database. Use the preview button to make sure there's no mistake — once split, there's no way to verify it without gathering the shares back together.
2
Set the split parameters
Set the total number of shares (e.g. 5) and the required minimum (e.g. 3). The parameters must be consistent with the number of people on the Configuration tab.
3
Generate and download the shares
Click "Generate shares". Download the secret-key-shares.txt file — assign each share (one line) to a specific person from the Configuration tab's list.
4
Verify the reconstruction
Before distributing the cards, it's worth testing: enter any 3 shares from the file back into the Encryption tab (reconstruction mode) and check that the password comes back correctly.
💡
Compatibility with iancoleman.io
The shares are fully compatible with iancoleman.io/shamir — you can independently verify the password reconstruction there by pasting any required minimum number of shares.
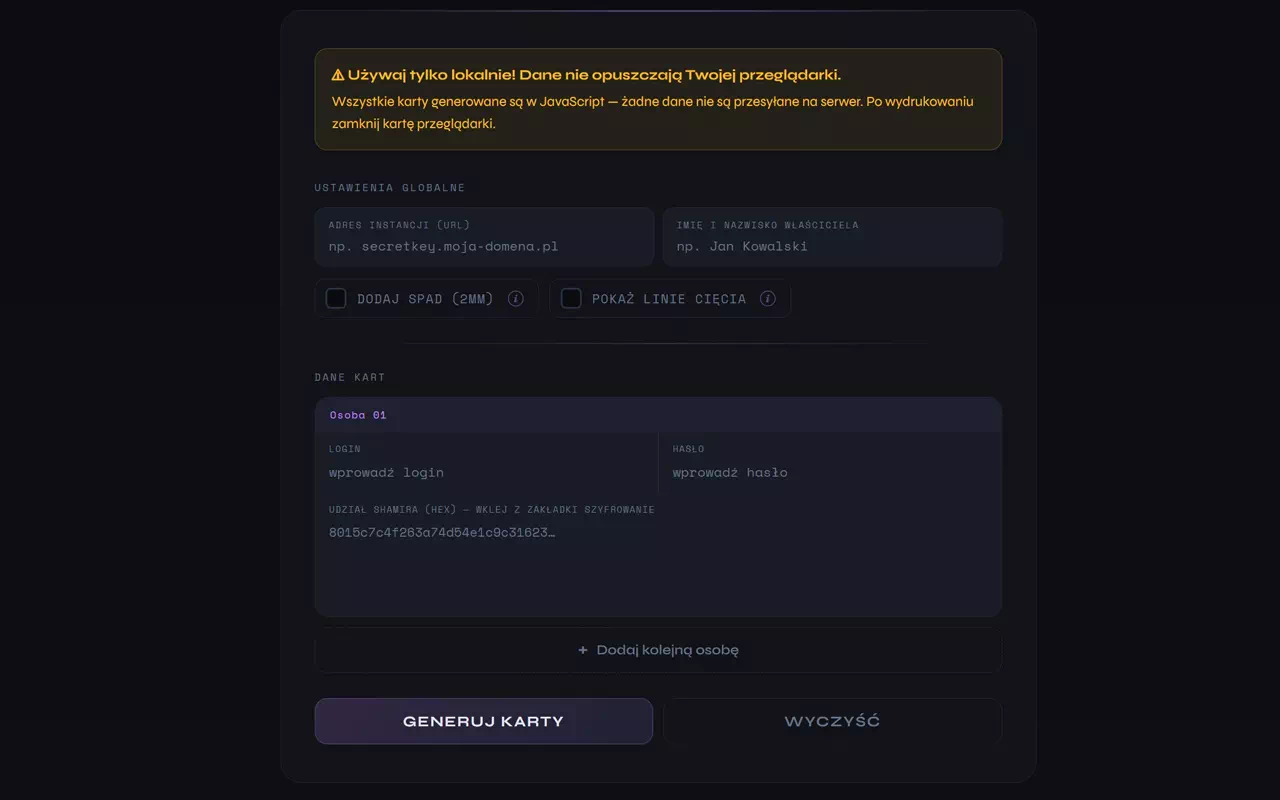
Creates personalized Secret Key cards in ISO ID-1 format (85.6×54mm), ready to print or laminate. Each card contains the login credentials, a Shamir share, and a QR code.
The URL of your Secret Key server and the owner's full name — both fields are shared across all cards and used in the message printed on the back.
2
Split parameters
Total shares (N) and Required shares to decrypt (K) — must match what you set on the Configuration and Encryption tabs. They also affect the default card message text.
3
Card message (back)
An editable text field (live counter) with the text shown on the back of each card. The 320-character limit is a guideline, not a hard cap — the counter turns red past it, but you can keep typing (there just isn't much room on the card). Leave it empty to use the default text (shown as a placeholder). Available tokens — {{N}} (number of shares), {{N_MINUS_1}} (remaining people), {{K}} (required threshold), {{URL}} (instance address) — can be typed by hand or inserted at the cursor position by clicking the matching pill below the field.
4
PDF options — Bleed and Crop marks
2mm bleed — extends the print area by 2mm on each side (a print-shop standard that avoids white edges). Crop marks — prints corner marks for precise cutting.
5
Card (people) list
Each card is a row with fields: Login, Password, and Shamir share (hex) — login credentials come from the Configuration tab, the share from the secret-key-shares.txt file. First/last name isn't entered per person here — it only appears once, under "Global settings" (it refers to the system owner, not the card recipient).
6
Card preview
After clicking "Generate cards", a preview of the front and back of each card appears. Check the data is correct before printing.
7
PDF download
Two buttons: ↓ Download card PDF (one card, 2 pages) and ↓ Download all cards PDF (all cards at once). The PDF is generated via window.print() — Chrome handles this best.
Provide your Secret Key server's URL — without https://, e.g. secretkey.my-domain.com — and the owner's full name. Both fields will appear on the card.
2
Set the split parameters
The number of shares (N) and the threshold (K) must match what you set on the Configuration and Encryption tabs. They also affect the default card message text.
3
Customize the card message (optional)
Leave the field empty to use the default text, or write your own. The counter turns red past 320 characters as a guideline (it won't stop you from typing) — there isn't much room on the card, so keep it concise. You can type the tokens {{N}}, {{N_MINUS_1}}, {{K}}, {{URL}} by hand, or click their pills below the field to insert them at the cursor position.
4
Choose the print options
If you're ordering print-shop printing, enable Bleed and Crop marks. If you're printing yourself on a regular printer, you can leave both off.
5
Fill in each person's data
For each person, enter the login and password (from the Configuration tab) and the Shamir share (the matching line from the secret-key-shares.txt file). Assign shares in the same order as the people.
6
Generate the preview and check it
Click "Generate cards". Carefully check each card in the preview — verify the login credentials, the share (first and last hex characters), and the instance address.
7
Download and print
Click "Download all cards PDF". In Chrome's print dialog: set Margins: None, enable Background graphics, and set the paper size to a custom size matching your chosen bleed option. Each card = 2 pages (front + back).
✅
After printing — laminate the cards
Lamination protects the card from water, dirt, and physical damage. Recommended pouches: 80–125 µm. Don't use pouches thicker than 150 µm — they can cause bubbling on the colored SVG gradients.